Jan 10, 2026
How to do a deep facial cleanse at home: a quick and effective guide

Doing a deep facial cleansing at home is much more than washing your face. It is a self-care ritual that is responsible for thoroughly removing impurities, dead skin cells, and all that pollution that accumulates day after day. The best part is that it is a highly accessible process that you can adapt to whatever your skin needs to renew it, improve its texture, and, in the process, make your favorite products work much better.
Why your skin needs more than a daily cleanse
Your daily cleansing routine is key, without a doubt, but it almost always stays on the surface. Pollution, makeup residue, and even the skin's own sebum can clog pores at a deeper level. The result? The dreaded blackheads, unexpected breakouts, and skin that looks dull and tired.
That is exactly where a deep facial cleansing makes all the difference.
Think of this treatment as a "reset" for your complexion. By decongesting the pores in a controlled and safe way, you are not only preventing imperfections, but you are also giving cell renewal a boost. Skin that breathes, free of obstructions, absorbs the active ingredients of your serums and creams much better, taking their benefits to the next level.
The complete facial cleansing process
Adopting this habit is a direct investment in the health and vitality of your skin. Interest in self-care has grown a lot, and it is no surprise that personal care products are gaining more and more space in Mexican homes. Understanding each phase well will help you complete the process safely and effectively.
The following diagram visually shows you the three essential phases of the process: clean, treat, and nourish.
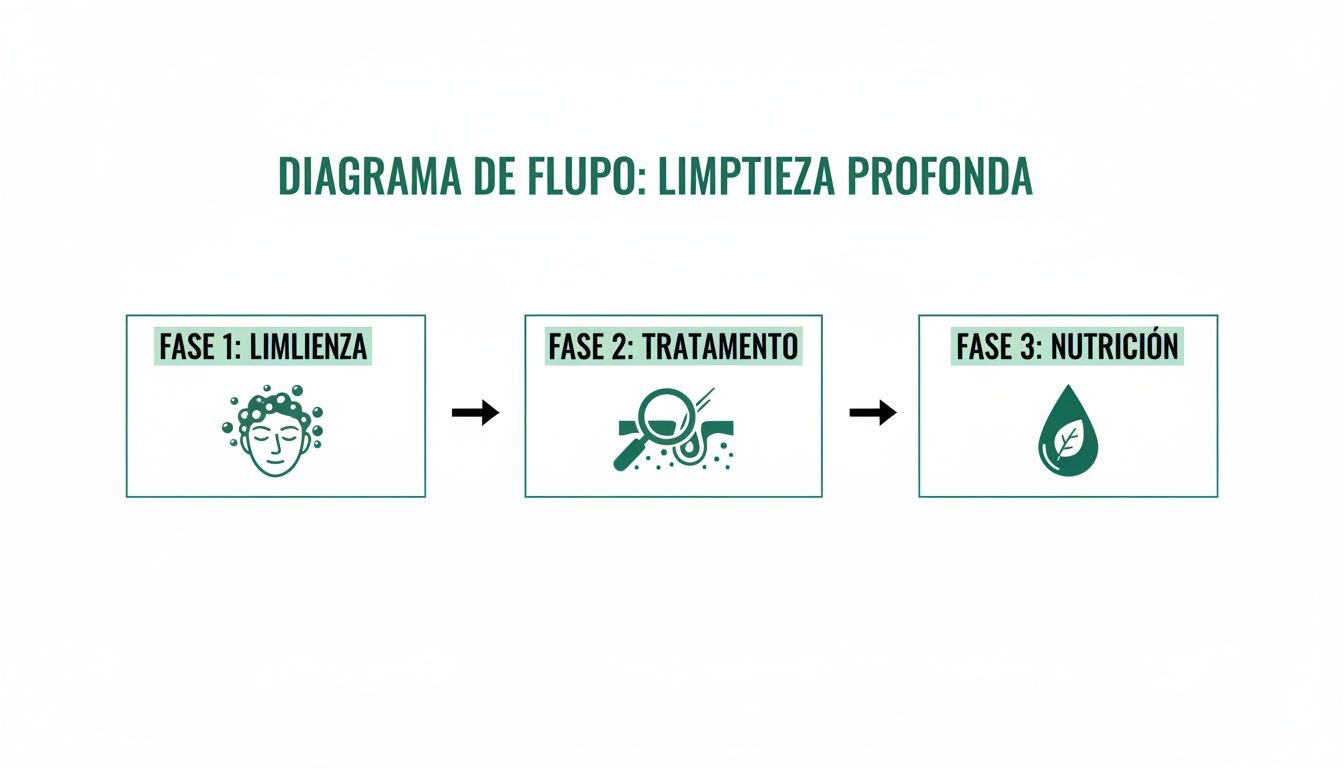
As you can see, the idea is to prepare the skin, address its specific needs, and, in the end, restore all the hydration and nutrients to soothe and protect it. If you are suddenly looking for an even more complete experience to pamper yourself, you can explore options like a spa with facial cleansing to complement your routine at home.
A very common mistake is believing that deep cleansing is only for oily skin. The reality is that all skin types benefit from a detox from time to time, as long as the right products are used for each one.
To give you a clearer idea of how important it is to go beyond daily cleansing and explore advanced options, you can find out about the professional facial cleansing services that exist. Guided by this, you will be more than ready to transform your bathroom into your own wellness sanctuary and give your skin the care it truly deserves.
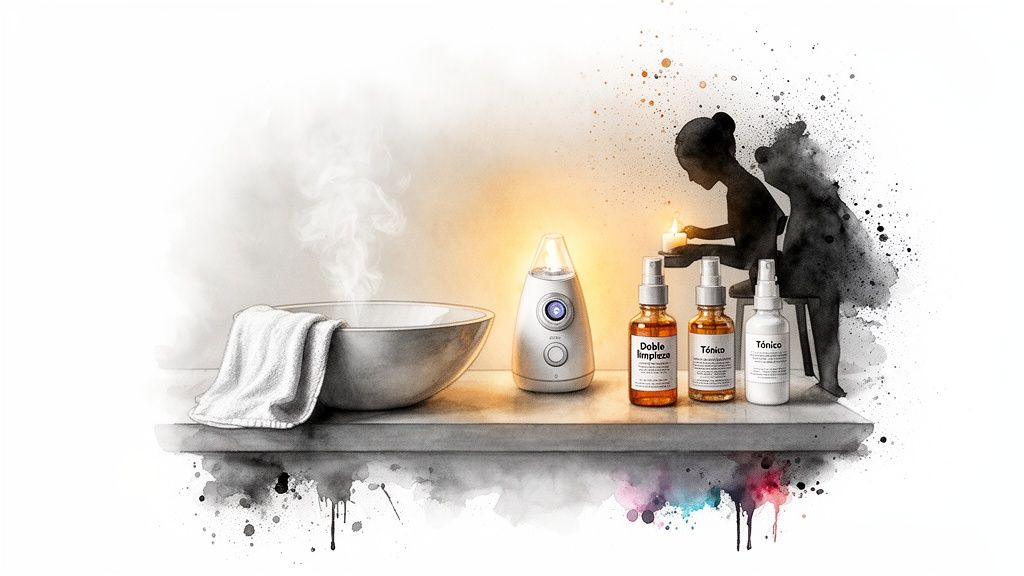
Prepare your space and your tools: the first step toward renewed skin
A successful deep facial cleansing does not start when you touch your face. It starts much earlier, by creating an atmosphere that invites you to unplug and truly take care of yourself. The idea is to transform your bathroom or a corner of your bedroom into your own wellness sanctuary. Dim the lights, put on that relaxing playlist, and, most importantly, have everything you will need close at hand.
This simple act of preparation changes everything. It prevents interruptions and elevates the process from a simple task to an authentic ritual. Once the environment is ready, the focus shifts to your skin.
The proper preparation of the skin
Before any deep treatment, skin must be spotless. This is where the double cleanse comes into play, a fundamental technique that ensures the removal of any trace of makeup, sunscreen, pollution, and surface dirt. The first step is an oil-based cleanser to dissolve oily impurities; the second, a water-based cleanser (gel or foam) to finish off the cleansing.
With a clean face, the next move is key: safely opening the pores. Steam is your best ally to soften the skin and facilitate extraction without having to apply excessive force, which could hurt you. You can do this very easily with a clean towel moistened in hot water and placed over your face, or by using a facial steamer for about 5 to 10 minutes. This process not only prepares the pores but also improves circulation. If you want to master the technique, take a look at our guide on how to do a facial steam bath at home.
A key tip: keep a safe distance from the steam to avoid burns. The sensation should be warm and pleasant, never too hot.
Your at-home facial cleansing kit
Having the right tools and products is essential to achieve professional and, above all, safe results. You do not need an arsenal, but rather the precise and well-organized elements. Here is a list of must-haves for your session:
Gentle cleanser: Ideally two. One oil-based and one water-based for the double cleanse.
Exfoliant: This can be physical (with very fine granules) or chemical (with acids such as glycolic), depending on what best suits your skin type.
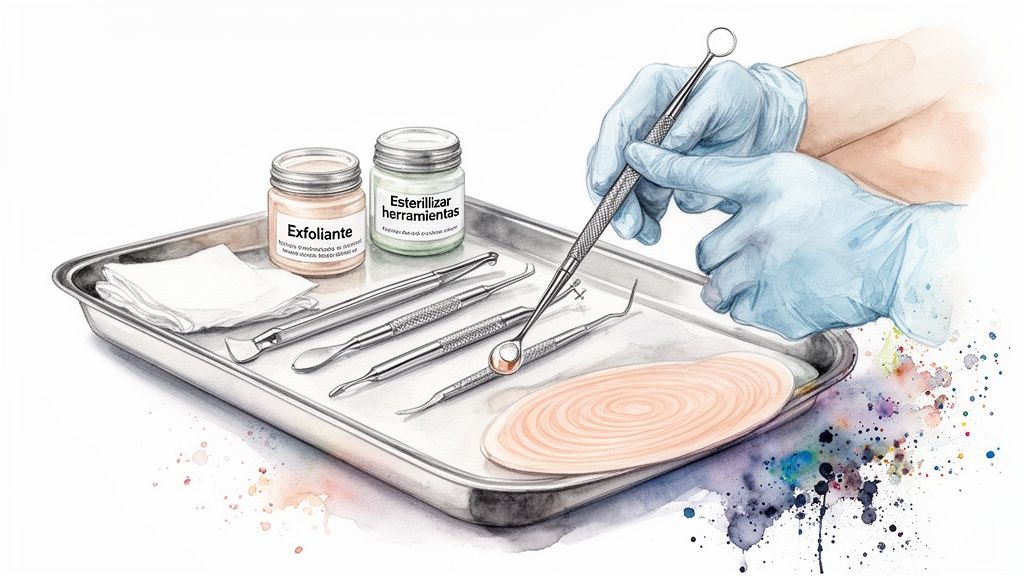
Sterilized extraction tools: If you decide to do extractions, use a stainless steel comedone extractor. Never, ever use your fingernails.
Facial mask: Choose one based on your main need. Clay masks purify, hyaluronic acid masks hydrate, etc.
Toner: To rebalance the skin's pH after the whole cleansing process.
Serum and moisturizing cream: Indispensable for nourishing and sealing in moisture at the end of the treatment.
Exfoliation and extraction: the phase that changes everything
Once the skin is clean and the pores are open thanks to the steam, we enter the crucial part of the treatment. This is the phase that truly defines deep facial cleansing at home. Exfoliation and extraction are the steps that polish the skin's texture and free the pores, but beware, they are also the ones that demand the most care and a good technique.
The first move in this stage is exfoliation. Its mission is simple but powerful: to remove that surface layer of dead cells that dim the brightness of your face and, if they accumulate, can clog pores. Here, the key to success is choosing the right product to avoid ending up with irritated skin.
Choose your secret weapon: the ideal exfoliant
There are two major families of exfoliants. Understanding which one is best for you is essential to obtain professional results without leaving home.
Physical exfoliants: These are the ones that contain small granules (such as fine sugar, seed particles, or microspheres) that mechanically polish the skin. They work wonders on normal or oily skins that are not particularly sensitive. The secret is for the granules to be very fine and rounded to avoid micro-scratches.
Chemical exfoliants: These do not scrub. They use gentle acids (like AHAs, for example, glycolic acid, or BHAs, such as salicylic acid) to dissolve the "glue" that holds dead cells together. They are by far the best option for sensitive skin, acne-prone skin, or if your goal is to treat dark spots and improve overall texture.
Whatever your choice, the application should always be gentle. Apply the product onto damp skin and massage with circular and upward movements, without pressing too hard. You can concentrate a bit more on the T-zone (forehead, nose, and chin), but treat your cheeks, which tend to be more delicate, with great care.
The art of extraction: precision and absolute hygiene
After exfoliating, and taking advantage of the fact that the pores are still dilated by the steam, the moment for extraction arrives. Here, there is an unbreakable golden rule: absolute hygiene and total control. One wrong move and you can end up with inflammation, a mark, or, in the worst cases, a scar.
Never use your fingernails to squeeze an imperfection. Bacteria live underneath them that can cause an ugly infection. Furthermore, uneven pressure almost always damages the surrounding skin, leaving a mark that takes weeks to fade.
To extract blackheads safely, follow these steps:
Sterilize your tools: If you have a comedone extractor, clean it with rubbing alcohol before and after using it. No excuses.
Protect your fingers: If you prefer to do it with your fingers, wrap your fingertips in sterile gauze or clean paper tissues.
Apply controlled pressure: Place the tool or your fingers on the sides of the blackhead and exert a gentle, downward pressure. If it does not come out easily, do not insist. Forcing it only means it was not ready to come out and the only thing you will accomplish is hurting yourself.
It is crucial to know when to stop. You should only attempt to extract blackheads (open comedones) or sebaceous filaments. Never, under any circumstances, attempt to touch inflamed pimples, red bumps (papules), or those that already have visible pus (pustules). By doing so, you risk spreading the infection to other areas.
This phase of facial cleansing reflects a much broader trend in current cosmetics, where we look for products with powerful active ingredients to see real results, very much like what is happening with skinification. This trend, which consists of integrating skin-care active ingredients into makeup, is gaining more and more ground in Mexico. If you are interested in learning more about industry trends, you can take a look at this applied chemistry guide on the cosmetics industry in Mexico.
How to soothe and nourish your skin after cleansing
You have already gone through exfoliation and extraction, so your skin is incredibly clean, but also sensitive and begging for some love. This is the moment to pamper it, to restore calm and nourish it so that it recovers completely and reveals its full potential. Think of it as the grand finale that seals in all the benefits of the treatment and reinforces your skin's protective barrier.
The star of this stage is, without a doubt, the facial mask.
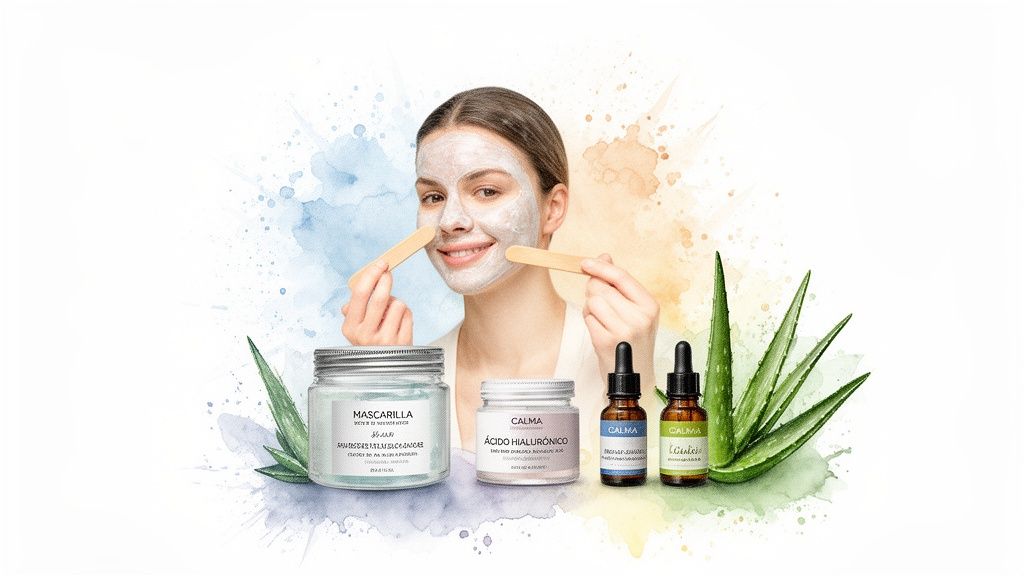
Picture the mask as a super-concentrated dose of active ingredients working to rebalance your skin. Choosing the right one is essential, because not all of them do the same thing. The key is to listen to what your skin needs right at this moment.
Choose the ideal mask for your skin
Use this guide to find the perfect mask according to your skin's needs after deep cleansing.
Skin type | Recommended ingredient | Main benefit |
|---|---|---|
Oily or combination | Clay (green or white) | Absorbs excess sebum and purifies pores without drying out. |
Dry or dehydrated | Hyaluronic acid, ceramides | Deeply hydrates, restores elasticity, and plumps the skin. |
Sensitive or irritated | Aloe vera, calendula, centella | Soothes redness, reduces inflammation, and comforts immediately. |
Each mask has its own mission. Once you identify yours, you will be giving your face exactly what it needs to recover and look spectacular.
A golden tip: Always respect the application time indicated on the packaging. This is typically between 10 and 15 minutes. Leaving it on longer does not make it more powerful; in fact, in the case of clay masks, you could end up dehydrating your skin. To remove it, do it gently, using lukewarm water and a facial sponge.
The closing ritual to seal in the results
Okay, you have removed the mask, but the mission is not over. The steps that follow are crucial to protect the skin and ensure that all the effort is worth it. The order here is extremely important, a principle that, by the way, we explore in depth in our guide on what order skincare products go in.
1. Toner to restore balance
Right after the mask, apply a toner. It is not a whim, it is a necessity. This product helps to restore the skin's natural pH, which may have been slightly altered by the cleansing, and leaves it ready to much better absorb what comes next.
2. Serum for a focused treatment
Now it is the turn of the serum. This is your moment to target those specific concerns with a concentrated active ingredient. For example, a serum with niacinamide is a wonder for minimizing the appearance of pores and keeping oil production at bay.
3. Moisturizer to protect and seal
And to close on a high note, apply a moisturizer suitable for your skin type. This step is non-negotiable, even if you have oily skin. The cream creates a barrier that seals in hydration, prevents water loss, and protects your newly pampered skin from environmental aggressors.
This type of personal care ritual is not just a trend, but a rapidly expanding market in Mexico. The sector is estimated to reach a value of 8,932.95 million dollars in 2024, demonstrating the importance we give to feeling and looking good.
What you do after matters (and a lot): care and common mistakes
The facial does not end when you put on your moisturizer. In fact, what you do in the next 24 to 48 hours is as crucial as the cleansing itself for the results to stay and to not cause a disaster. Your skin is in a vulnerable state, like a sponge, super receptive to everything. It needs you to treat it with care to recover well.
Believing that you are already done is the first and most common mistake. Newly exfoliated and treated skin is much more sensitive to the sun, pollution, and even your own hands. That is why aftercare is not optional; it is the phase that ensures that your effort was worth it.
Key care after your cleansing
To protect your skin and so that you truly see the benefits of the treatment, you must integrate these practices into your post-cleansing routine. They are simple gestures, but they make all the difference in how your face looks and feels the next day.
Here is a direct and to-the-point list of tips:
No makeup, please: Give your skin a chance to breathe. The ideal is not to wear makeup for at least 12 hours, although if you can hold out for 24, much better. Pores are open and the last thing you want is to clog them again and cause a breakout.
Sunscreen is non-negotiable: Right now, your skin is more exposed than ever to UV ray damage. Apply a broad-spectrum sunscreen (with SPF 30 or higher) even if you are staying indoors. The light coming through the window also counts, and a lot.
Pause powerful active ingredients: Forget about other exfoliants (physical or chemical), retinol, or high-concentration vitamin C for the next two or three days. Using them right now could cause a major irritation.
Hygiene is your best friend: That night, change your pillowcase for a clean one. And for heaven's sake, avoid touching your face with your hands. You do not want to transfer bacteria to your skin when it is so sensitive.
Typical mistakes that can ruin all your work
Knowing how to do a deep facial cleansing at home also means knowing what not to do. Avoiding these blunders is essential so that you do not go from an amazing treatment to a skin problem.
One of the worst mistakes is applying too much force when extracting. If a blackhead does not come out with gentle, controlled pressure, leave it alone. Insisting will only leave you with inflammation, a mark that will take weeks to fade, or, in the worst cases, a scar.
Another huge mistake, especially if you have oily skin, is skipping the final moisturization. There is this myth that oily skin does not need cream, but it is exactly the opposite. When skin is dehydrated, it produces even more sebum to compensate, trapping you in a vicious cycle of shine and new pimples.
And last but not least: using products that are not for you is the perfect recipe for disaster. A highly aggressive exfoliant on sensitive skin can leave you red and flaky for days, while an extremely heavy cream on oily skin is bound to clog your pores. Knowing your skin is the first and most important step to taking good care of it.
Common doubts about at-home facial cleansing
Answering the usual questions is what will give you the confidence to do your treatment without fear. Here are direct answers, just as if we were chatting, so that your deep cleansing at home is a complete success.
How often is it healthy to get a deep cleanse?
There is no single recipe here, because your skin dictates the ideal frequency. However, there are guidelines that work as an excellent starting point to keep your complexion balanced.
Oily or breakout-prone skins: The ideal is to do it every 4 to 6 weeks. This helps you keep pores in check and regulate that extra sebum production on a consistent basis.
Normal or combination skins: Once every 6 to 8 weeks is usually more than enough. With that, you manage to remove the accumulation of impurities and give your skin a good reset.
Dry or sensitive skins: In your case, less is more. Spacing out the treatment every 2 to 3 months is best to avoid disrupting its protective barrier, which is already naturally more fragile.
The real trick is learning to observe your skin. If it feels congested, looks dull, or you notice that your creams are no longer absorbing in the same way, it is a very clear sign that it needs a cleansing.
What do I do if my skin turns very red or irritated?
First of all, a little redness right after the treatment is normal, especially where you did extractions. It is a sign that you activated circulation and it should calm down within a few hours.
Now, if the irritation is more intense or does not go away, the first thing is to soothe. Apply cold compresses (never ice directly on the skin!) or pure aloe vera gel to reduce inflammation. For the next two days, simplify your routine to the max: just a gentle cleanser and your moisturizer. Forget completely about products with alcohol, strong fragrances, or acids.
If you notice that the redness worsens, there is swelling, you feel itchy, or it hurts, we could be talking about an allergic reaction or something more serious. At that point, the wisest thing is to stop everything and consult a dermatologist.
Can I do it if I have active acne or rosacea?
Be very careful here, because prudence is your best ally.
If you have inflammatory acne (pimples with pus or cysts that hurt), do not even think about trying to extract them at home. You risk worsening the infection, spreading bacteria all over your face, and, worst of all, earning a lifetime scar. In these cases, better focus on the gentler steps of the ritual: super delicate cleansing, distance steaming, and a soothing clay or green tea mask.
With rosacea, it is a similar story. You must avoid hot, direct steam at all costs, because it can be a trigger for a flare-up. Exfoliants with granules are also out. Your best option is ultra-gentle cleansers, without rubbing, and decongesting masks with ingredients like centella asiatica or chamomile.
The golden rule is: for any active skin condition, the main recommendation will always be to discuss it with a professional before venturing into a deep treatment on your own.
At Zen to Go, we know that wellness is a puzzle where every piece counts. Just as you care for your skin, caring for your mind and body is equally important. Discover how we can bring relaxation and stress relief right to your door with our at-home massage and corporate services. Take a look around our website and take the next step on your path toward holistic wellness.